Making Bread
Originally published April 22, 2020.
This blog post is a bit different, written in response to years of requests from friends and neighbors. I am hoping that I never have to type out instructions again because I can just send people to this page now….It is something like a recipe for my infamous “Brick Bread,” but with the caveat that I consider bread baking most definitely an art and not a science that you can replicate. Too much of it depends on the stars, your ingredients, your menstrual status (I am not kidding, don’t try and make bread rise when you are on our moon time!), the humidity and temperature in your kitchen, your oven, your pans, the quality and nature and vitality of your starter culture etc etc. So take it all with a nice coarse chunk of Himalayan sea salt! But as I was telling my perfectionist daughter last night, the great thing is that most bread is super delicious when eaten slightly cooled from the oven, and warms the house and fills it with delicious smell. So it may not end up exactly as you intended, in fact there is no such thing as a single ideal state of perfection, but it will always be perfect. Just accept it and bite right in. And, if you can, top it with homemade goat cheese and jam. Have fun! And share your results!
STEP ONE: GETTING THE BASIC INGREDIENTS READY
Unfortunately, I do think that the trick to this particular kind of bread is fresh ground whole grain meal, for which there is no shortcut. You simply cannot buy fresh ground meal in the consistency I use anywhere that I am aware of. Yes, it’s a LOT of work to grind meal for a few loaves by hand, but I embrace it as exercise and preparation for when I will either milk goats or play accordion again.
You can use all rye, but I usually do about two thirds rye to one third kamut. Sourdough loves rye. And we all eat too much wheat anyway. As long as you use about half rye, you can use other grain for the rest. Whole grain keeps for a long time, while ground whole meal our flour goes rancid.
I buy my grain in 50 lb bags, special order from my local community grocer, and store it in a cooler or 5-gl bucket in the shed (mouse-proof), which means I am well set to feed myself and a few friends for an extended quarantine. You might find a variety of whole grains at your local natural foods store, but the selection may not be great. Just ask if they can special order a fresh bag for you.
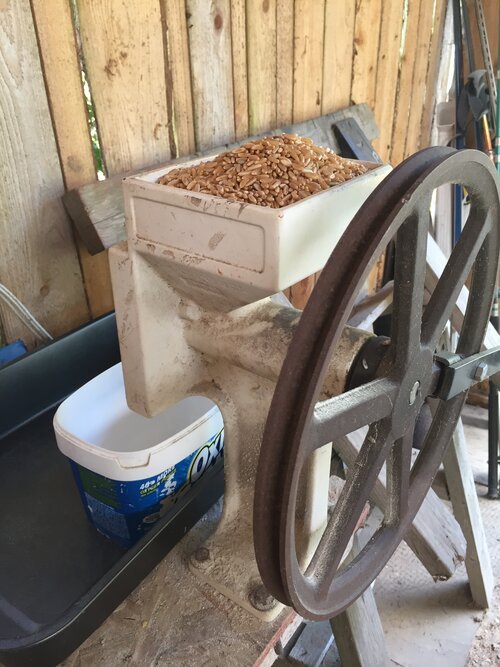
I swear my bread is so good (and healthy) because I ground the grain right before using it. I use an old hand mill that is older than my daughter (who is in college now), which was one of the best investments in my life. But I used a KitchenAid grain mill attachment when I used to make it decades ago in larger quantities that required mixing it in a five-gallon bucket.
Finding the perfect grain mill requires a lot of research. Just make sure that the grain doesn’t get too hot during milling and that you can adjust the mill to the coarse meal setting that you need for this bread. Cheap hand mills like the Corona meat grinder will not work long term. They just are too much work.
The only caveat is that you cannot use these kinds of grain mills for sprouted, wet grain. That is a very different kind of bread, and for sprouted grain something like the Corona mill works great because it’s much softer.
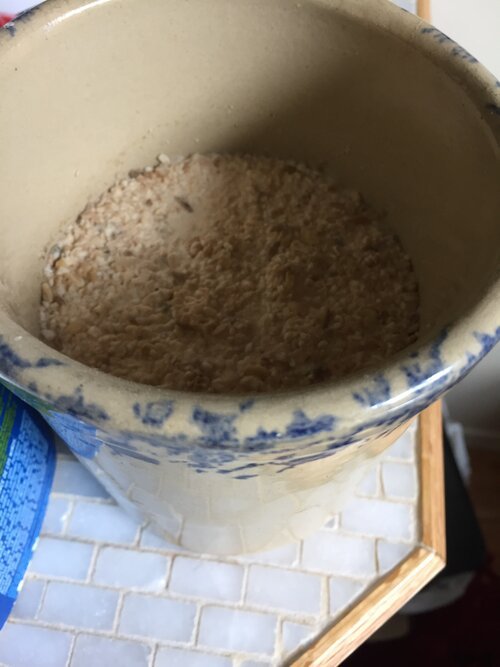
So here is what the ground meal looks like, a bit like certain hot cereal mixes perhaps. Don’t set your mill to grind too finely, or too coarsely. You’ll figure it out. I usually grind about a quart-sized jar full of grain, to end up with a few loaves. One for me and the rest to share. And yes, that is an ancient OXO laundry detergent tub, an important tool because it’s exactly the perfect height and width and size. I’ve had it for years.
STEP TWO: REVIVING YOUR STARTER
The next step is your sourdough starter. The best way to get a starter is from a friend or neighbor. I have forgotten, ruined, or otherwise lost many starters and just practice non-attachment. They are easy to make with flour and water and your local friendly yeasties in the air. No need to get fancy. Warning: I have lost several to house sitters and house mates who think it’s rotten pancake batter.
And no, I don’t feed it every day or baby it in any other way. If it’s moldy because I haven’t made bread in too long, I scrape off the mold and excavate the good stuff from the center. I have tried to store it long-term in the freezer but found that it’s easier to just start from scratch.
In terms of storage, I bake about once a week, sometimes every other week if I get busy. In the colder months, I keep mine on the front porch, in the summer it goes in the fridge. But I don’t think it likes living in the fridge and does take a couple of days to return to life afterwards. Just be patient if you do have to store it in the fridge and give it lots of time to wake up slowly and gently. This may take between 1 and a few days. You will know when it’s alive again and ready for the next step.
In terms of a storage container, you don’t ever want to have it in contact with metal for an extended period of time, whether the metal bands on mason jars or a metal spoon or mixing bowl for letting it ferment. You also don’t want to close it up air tight. it’s alive and wants to breathe. I love my ceramic crock, which I have had for decades. But a mason jar with a napkin and rubber band is just fine.
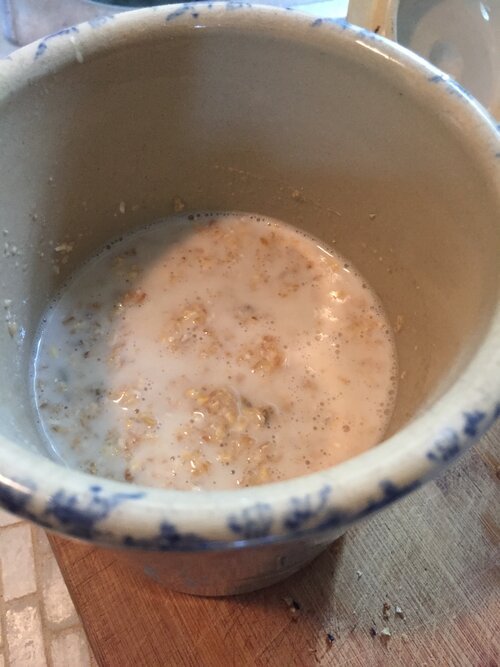
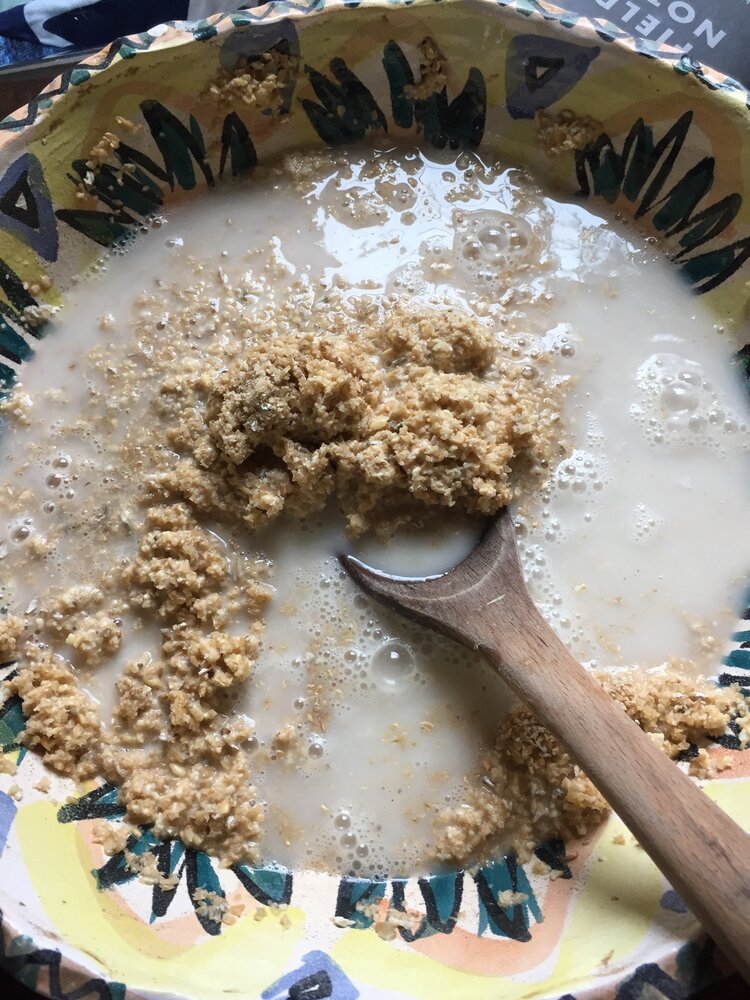
Once you have ground your grain and brought your starter inside, resuscitate it by adding water to it and a bit of grain to make a pretty runny paste like this…. And if you stored it in the fridge, you may have to feed it more than once to gently bring it back to life.
STEP THREE: ADDING THE BIRD FOOD
Now comes the fun part. When the starter is ready and happy and bubbly (anywhere from 12 to 48 or more hours, depending on where and how you stored it, you add the ground meal to it, as well as all the other fine add-ons.
So now you pour it into your mixing and fermenting bowl.
And now, VERY IMPORTANT, please please, please do NOT forget to take some of this starter and reserve it BEFORE you put seeds and salt in it.
In the beginning of your bread baking career, make yourself a sticky note! And I have learned, for me, it works to pour all the starter out and wash and air dry my starter crock before I put the new stuff in it. Buys me a little extra time if I don’t get around to baking regularly. If you bake every few days, you may not need to do this. Or you may live in a climate with less mold than the Pacific Northwest rain forest, where I live.
At the danger of overdoing the visuals in this blog, this is what it looks like when you add water to the starter dough:
Back to your future bread dough: Now is the time to add the following:
1-2 teaspoons of salt (depending on taste), per loaf (essential)
1-2 cups depending on taste) of rolled oats, per loaf (optional)
various seeds (optional)
caraway (optional)
oh… and … water…
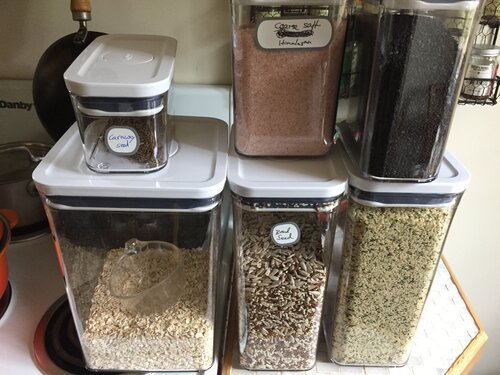
Grinding grain by hand is hard work, so I add rolled oats (which I buy in 25-lb bags) and a bunch of seeds for extra bulk and nutrition. You can add any seeds that you like, and you don’t HAVE to add seeds but I always do because it makes the bread a more complete form of nourishment due to the protein and provides nice texture. I buy my seeds in 5 lb bags but have also been known to buy sunflower seeds in 25-lb bags. Those are my favorites. I also make sure I have flaxseeds on hand. A more recent addition has been black sesame seeds, because the Asian grocery store has them at a good price and I know they are good for the brain. Hemp seeds are great too. Caraway is a German spice/seed that I absolutely must have because the combination of rye and caraway is heaven to me, but most Americans can probably live without it. You will find yourself using a fair amount of salt if you make bread regularly for yourself and your family and community.
You can forget the oatmeal or the seeds but not the salt, or your bread will simply not taste good. Amounts above are very rough estimates since I always just grind a bunch of grain, then add a bunch of seeds and oatmeal and a few teaspoons of salt, and never know ahead of time how many loaves I will end up with. More on loaf pans below. Sorry, I am clearly not a cookbook writer.
You can sprout the seeds and when I am organized enough, I do. But it works fine with dry seeds poured straight in. If using sprouted seeds, you just have to be careful not to add too much water later on.
My gorgeous bowl is a specific bread mixing bowl that is also older than my daughter, made for me “with love” (as it says on the back) for just this purpose when I was still in college by my friend Tori Arpad. I think of her and our days of making bread in my back yard in Tucson every time I wash the bowl.
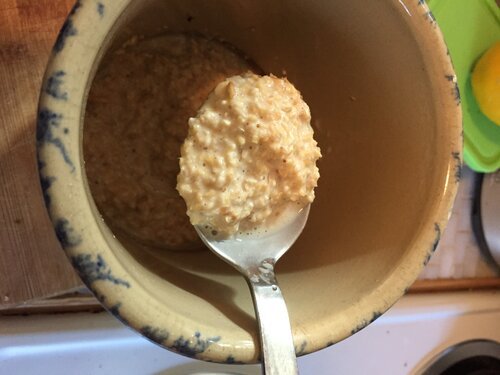
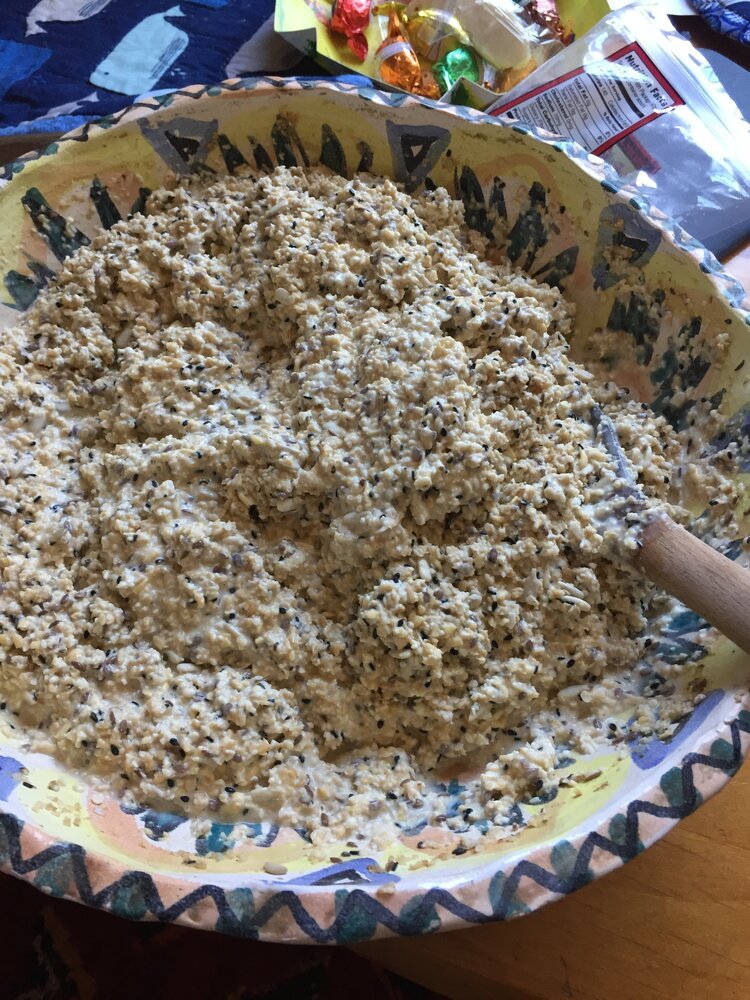
When you first add all the grain and seeds and oats, make a pretty wet dough. You will be surprised by how much water the ground meal will absorbed, compared to regular flour. This will take a few hours. Check in an hour or two and make sure it’s nice and wet. If you end up, after several hours, with water on the top, add some more oats or ground grain if you have any left, or even white flour, in a pinch. You don’t want a stiff dough. This is important.
STEP FOUR: PATIENCE
Now comes the essential and unpredictable part: You have to wait for the starter to work its magic. With my work schedule, my usual routine is to resuscitate the starter one day, then add the grain and seeds etc in the morning of the next day (or perhaps two if it’s a sleepy starter that needs a little extra time). Let it sit until the afternoon, or if it’s not ready, until the next day.
The duration of this fermentation period depends on many factors, mostly temperature but also the vitality of the starter, the proportion of starter to various additions. the amount of salt (which slows the starter down), and your and the universe’s state of health and mind. This is what makes bread-making an art, not a science, in my world. When it’s nice and bubbly and just right in consistency, you are ready for the next step. This is probably the trickiest part to get right, because if the dough is too stiff, like regular bread dough, it will turn into a brick, too stiff for the wild yeast to do its work. And if it’s waterlogged, the yeasts seem to just drown and can’t do their work either. I really hope the picture above is good enough. Kind of like dumpling or matzo ball dough that you add to soup with two spoons, or English muffins that you pour into forms on a skillet (not the rolled-out kind).
STEP FIVE: BAKING
Now you prepare your pans: I have a set of about 8 baking pans of various sizes so I always have the right pans for whatever amount of bread dough I end up with. I have thick metal bread pans that I treasure and use every week. I haven’t washed them in decades. In my experience, glass pans don’t really work, cheap metal pans end up burning the bread on the outside, and cast iron dutch ovens are WONDERFUL for making white or whole wheat kneeded bread but don’t work because this dough is way too wet. You don’t shape this dough. It must be wet enough that you just pour it in, like banana bread or carrot cake.
And because the dough is so wet, prep your pans well. I have a pastry brush just for this purpose, which I also haven’t washed in years. It lives with the pans. To me, it’s all about convenience and ease, so that I actually do this every week. Don’t make it a big production. if you must add white flour because you ran out of grain half-way through, do it. So much better and cheaper and healthier than any bread you can buy. Make it work for you. Sourdough made with wild yeasts is so forgiving. I have had bread rise for 3 days when I get busy writing, and it’s just fine.
BUT… once you pour the dough into the pans, you are committed. Then you have to be around and up and awake for the next few hours! And this part can’t be rushed either. It’s like getting kids ready for school, the more you rush, the stronger the resistance and the longer it will take… If you don’t have enough hours left in your day, it’s better to just let it sit covered with a towel until the next day. No big deal. You can simply add a bit more flour (and water, if needed) before you put the dough into the pans so that the yeasts have some new food to rise again.
I prep my pans by brushing them with oil and then covering with oatmeal, ground grains, or even white flour. It’s a little time spent but well worth it because when the bread is done, you just flip the pan over and the bread flops right out. Works like magic. And then you just let the pans cool off and stash them for the next week. Easy peasy.
Pour the dough into the pans, wait an hour or two, or even three (depending on all sorts of factors, see above) until your intuition tells you that it has risen enough. This is clearly a subjective assessment and not a science. Relax. It’s called “brick bread” for a reason and doesn’t matter all that much.
When the dough is ready, preheat the oven to about 425 or even 450 (depending on your rush, the oven’s temperament, your pans, and the dough and your mood), and put the bread in. You can even let the dough rise in the oven and just turn the temperature on when it’s ready. Bake for an hour or more (I’d plan on 1.5 hours but start checking after an hour), and “knock” the bread. That is the only way to tell if it’s ready. Take your knuckle and literally knock on the bread. It needs to give you firm resistance and not be soft any more. If you feel like it’s been long enough, you can take a loaf out and flip it onto a metal grate, and if it’s not nice and brown on the outside, just put it back in the pan, and bake it for a while longer.
This is what it looks like when it’s done.
Take the loaves out of the oven and immediately flip them out of their pans onto a metal grade to cool off.
AND NOW, also VERY IMPORTANT, do NOT cut into it right away or you will ruin it all. It will taste divine but the rest of the loaf will not cook through and it will go moldy faster. Please, be patient and let it cool off for at least half an hour. You will thank me later.
STEP SIX: EATING
I am a simple person. This is still my idea of heaven, after making and eating this bread almost every single day of my adult life, ever since I started working on this recipe with a tiny toaster oven and limited ingredients when studying as a German in Taiwan in my late teens with no access to what I would consider decent bread. This is the epitome of good living to me: Fresh bread from hand-milled flour, topped with home-made goat cheese from happy healthy well-nourished hand-milked goats and home-made jam. Come for a visit and I shall make you some!


